Follow Me On Social Media!

Mini King Cake Magic: Easy Recipe for a Sweet Celebration
Introduction to Mini King Cake
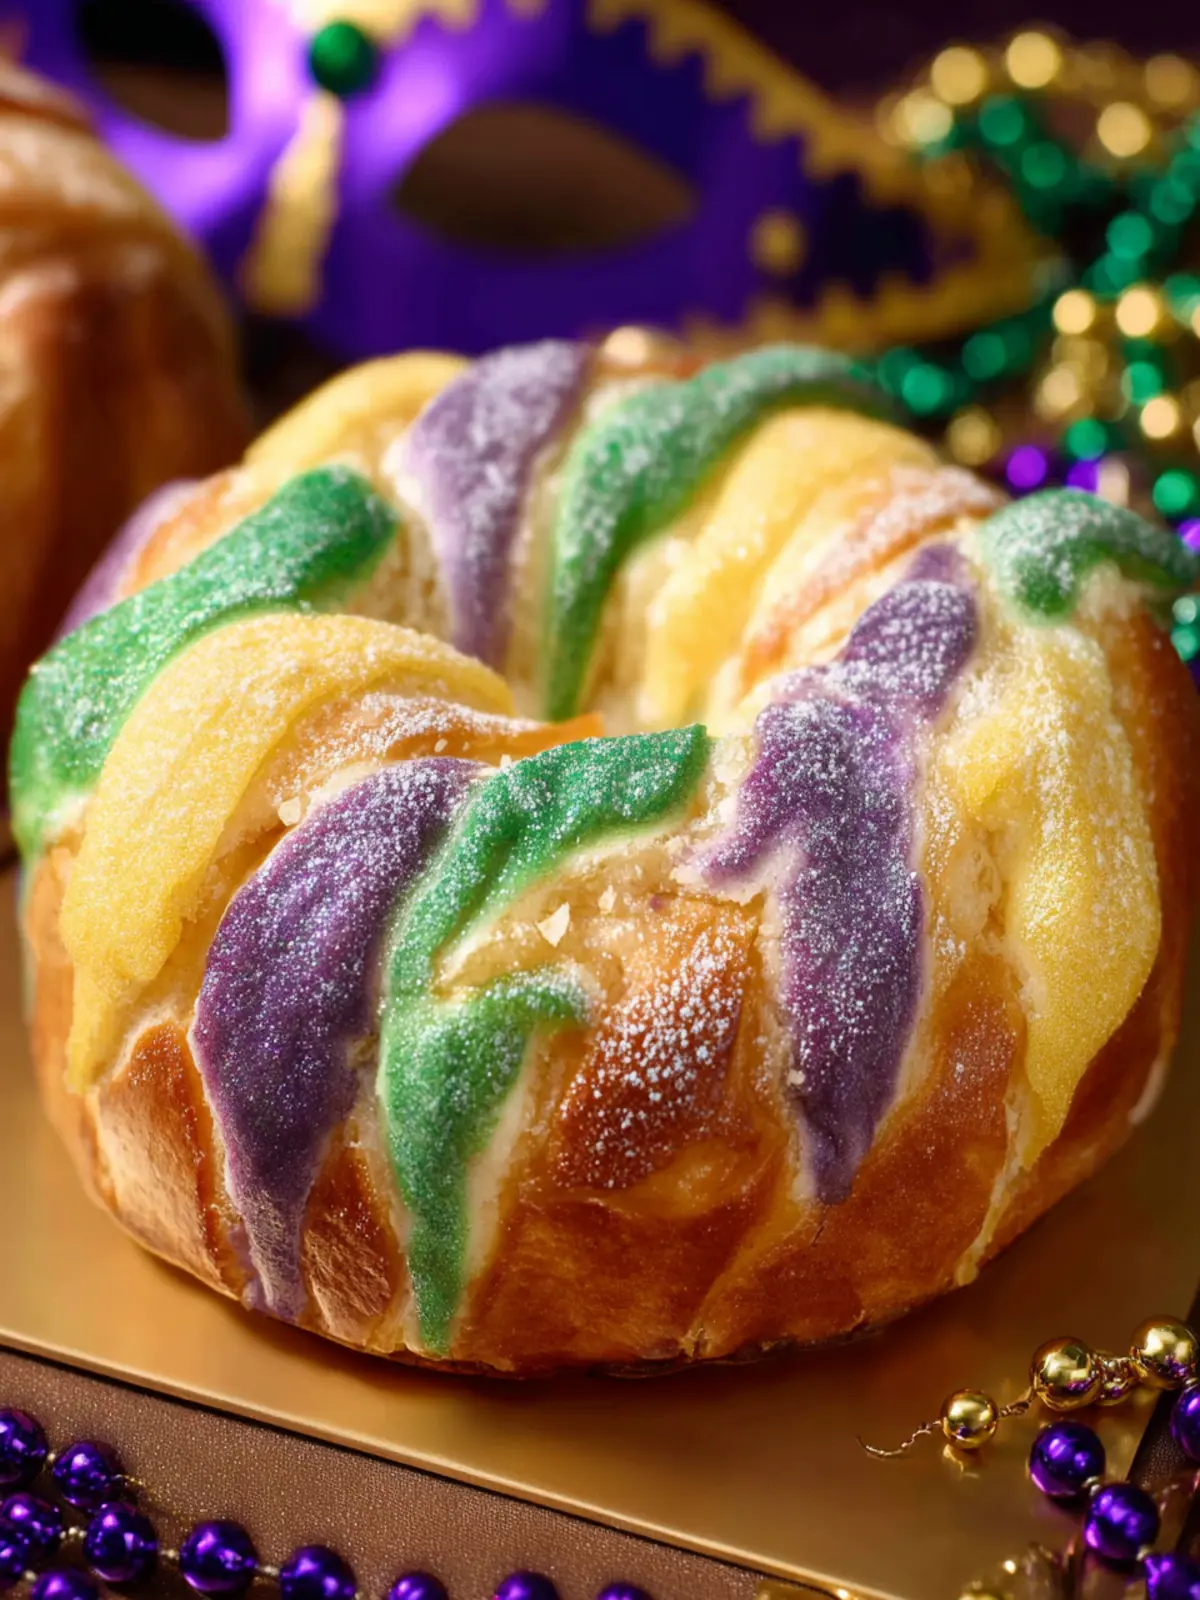
Imagine biting into a Mini King Cake, a delightful twist on a beloved tradition that’s been celebrated for centuries. The King Cake, originally associated with the Feast of Epiphany, marks the end of the Christmas season and welcomes the joyous Carnival festivities, especially in New Orleans. This colorful pastry, often crowned with vibrant sugar and a hidden surprise, embodies the spirit of celebration, where each slice brings a sense of community and joy.
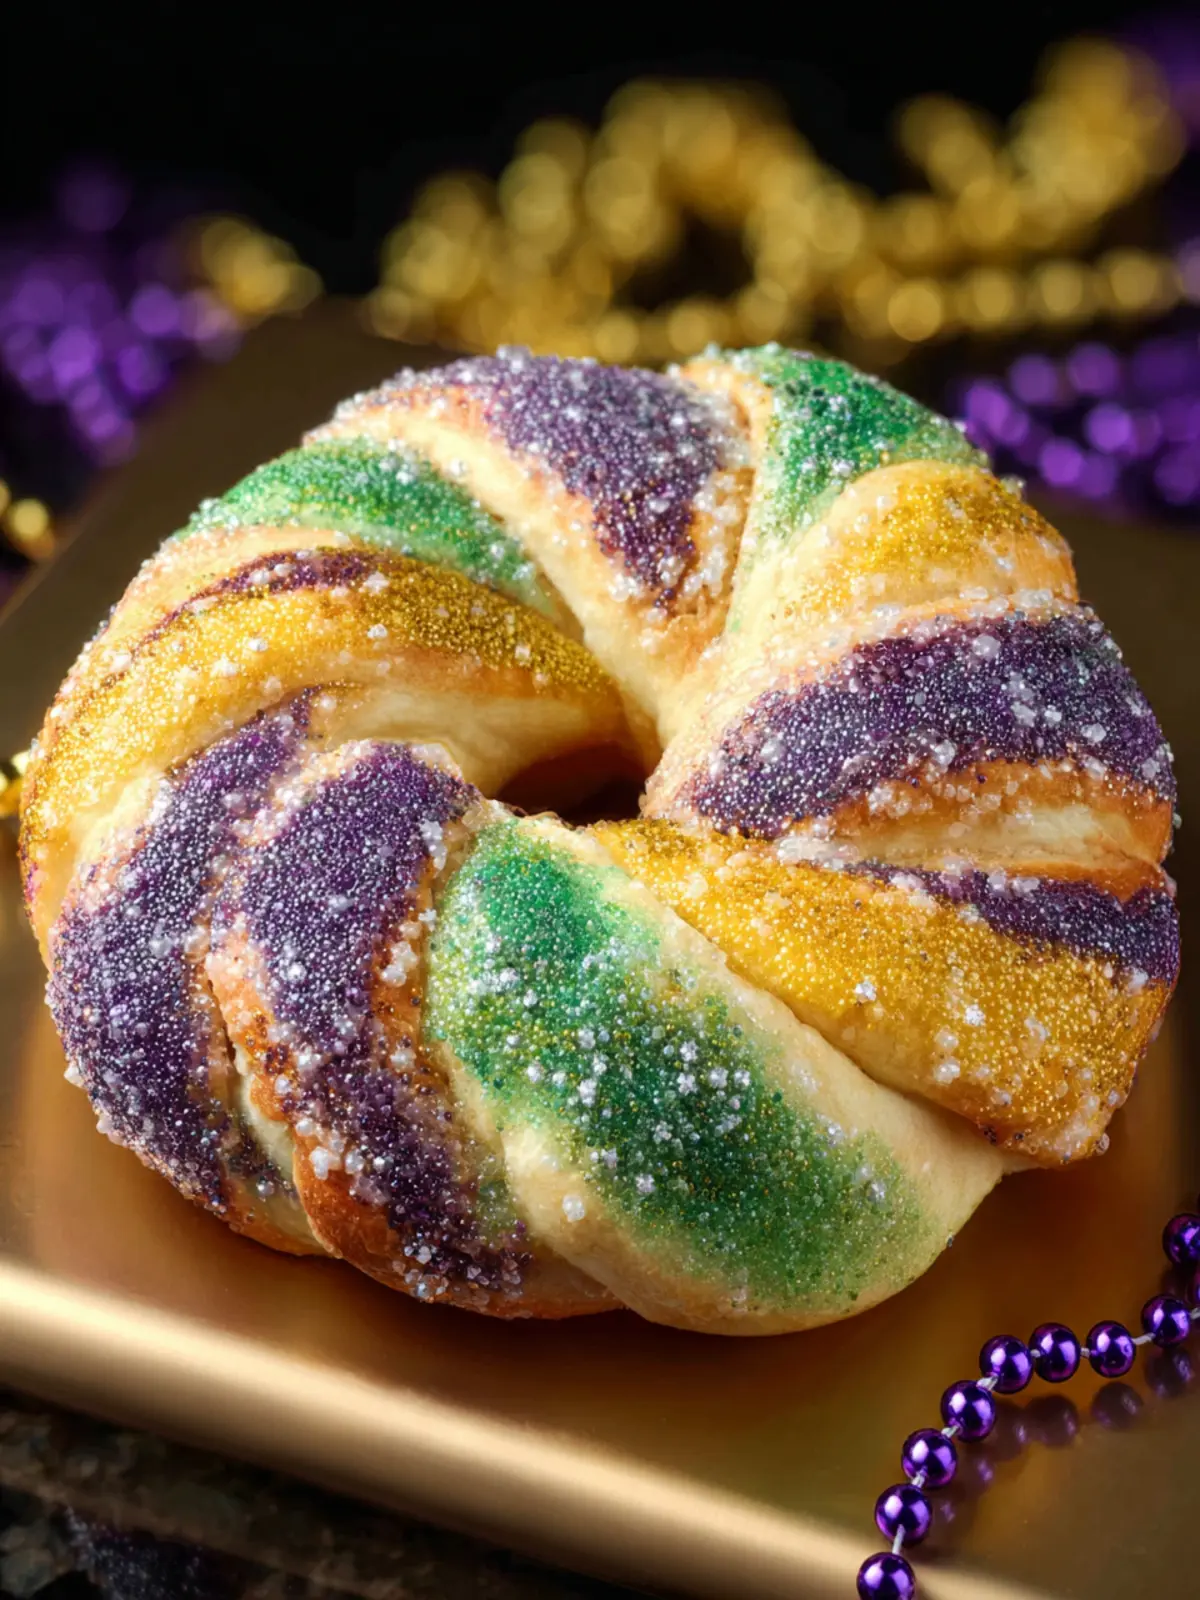
The roots of the King Cake can be traced back to ancient pagan celebrations marking the arrival of spring and the new year. Over time, it evolved into a Christian tradition, eventually becoming the centerpiece of Mardi Gras. Typically shaped like a crown, it symbolizes the three wise men who visited the baby Jesus. The cake is not just a dessert but an experience, often adorned with purple, green, and gold—colors representing justice, faith, and power respectively.
While you may have seen the traditional large King Cake at parades and parties, the Mini King Cake is perfect for individual servings, making it a more manageable yet equally festive treat. It allows more people to join in on the fun without the hassle of sharing a single sizable cake. Imagine hosting a gathering where each guest enjoys their miniature version, complete with a chance to find the charm hidden inside—who wouldn’t love that?
Not only does the Mini King Cake simplify serving, but it also opens the door for creative flavor variations. From classic cinnamon to luscious fruit fillings, the possibilities are endless, attracting both traditionalists and those willing to venture outside the box. So, whether you’re hosting a Mardi Gras party or simply want to indulge in a sweet treat, the Mini King Cake brings tradition and personal flair to every occasion, making it as delightful to make as it is to eat.
Prepare to delight your taste buds with this vibrant confection and celebrate the whimsical spirit of Carnival with every bite.

Key Ingredients for Mini King Cake
Crafting a delightful Mini King Cake is all about selecting the right ingredients, which harmonize beautifully to create a festive treat. Each component plays a crucial role in delivering that joyful flavor and texture.
Warm Milk
This is essential for activating the yeast and making the dough soft. The warmth encourages the yeast to activate, resulting in a light and fluffy cake.
Active Dry Yeast
The star of the show when it comes to lift and lightness! This ingredient is crucial for giving the Mini King Cake its airy structure.
Sugar
Granulated sugar sweetens the dough and enhances the overall flavor profile of our cake. It’s the secret ingredient that balances the richness of the butter and the tang of the cream cheese.
Salted Butter
Using salted butter adds richness and flavor to the dough, elevating it to a level that’s simply irresistible. The buttery aroma will fill your kitchen as it bakes!
Egg
An integral ingredient that binds everything together while enriching the dough. It contributes to that lovely texture that everyone will adore.
Flour
All-purpose flour forms the dough’s base, providing the necessary structure. Make sure it’s well-measured for the best results!
Avocado Oil
Perfect for greasing and brushing to keep the cake moist, avocado oil adds a subtle richness without overpowering the other flavors.
Cream Cheese
The luscious filling that adds a creamy texture, making each bite of the Mini King Cake a moment of indulgence.
Ground Cinnamon
This warm spice enhances the flavors and brings a comforting aroma to your baking experience.
Colored Sugar
Adding a fun and festive touch, colored sugar is essential for decoration, making your Mini King Cake as beautiful as it is delicious!
Why You’ll Love This Mini King Cake
Celebrating the joy of Mardi Gras, the mini king cake brings all the fun of the traditional treat into a bite-sized delight. Picture yourself surrounded by friends, enjoying these whimsical cakes that not only look festive but taste heavenly. Each mini version comes with its own surprise, sparking laughter and excitement as you dig in.
A perfect treat for celebrations
The beauty of a mini king cake lies in its versatility. Whether it’s a birthday party, a Mardi Gras gathering, or just a cozy get-together, these little cakes are sure to grab attention. Their colorful icing and playful decorations add an instant festive touch, making any occasion feel extra special. People love the tradition of finding the hidden baby figurine, and with a mini version for each guest, the fun multiplies!
Easy to make and customize
You don’t need to be a baking expert to create these charming treats. The recipe for a mini king cake is straightforward and allows for plenty of creativity. Want to add your own twist? Feel free to play around with flavors, fillings, and toppings. From cream cheese to fruit fillings, the options are endless. Plus, they bake up quickly, so you can whip them out just before your guests arrive!
Great for sharing with friends and family
Small in size but big on flavor, mini king cakes are perfect for sharing. Their individual servings make it easy to pass them around, which is ideal for spontaneous gatherings or potlucks. Plus, they’re just as delightful to enjoy alone with a cup of coffee, making them a versatile treat for any occasion. As you and your loved ones indulge in these sweet bites, you’ll create memorable moments that last far beyond the meal itself.
Tips for Making the Perfect Mini King Cake
Creating a mini king cake is not just about the ingredients; it’s an experience that can transform a regular day into something festive. When I first attempted this delightful treat, the anticipation of unwrapping layers of dough and indulging in the sweet flavors felt almost magical. Here are some tips to guide you through the process:
Proper Yeast Activation
To achieve that delightful, airy texture, make sure your yeast is fresh and activated correctly. Start by mixing warm water with sugar, allowing it to foam for about 5–10 minutes. This ensures the yeast is active and ready to work its magic in your mini king cake.
Dough Consistency and Kneading
Pay attention to your dough’s consistency. It should be soft but not overly sticky. Aim for that perfect balance; if it’s too wet, add a touch more flour, and if it’s dry, a bit more liquid can work wonders. Knead the dough for about 8–10 minutes until it’s smooth and elastic. This step is essential for that lovely, chewy texture we all crave.
Timing for Rising
Timing can be crucial. Allow your dough to rise in a warm, draft-free area until it doubles in size, which usually takes about 1–2 hours. If you’re pressed for time, look for shortcuts, such as placing the dough in a slightly warm oven.
Braid Technique for Beautiful Presentation
When it comes to forming your mini king cake, a proper braid can elevate its presentation. Divide the dough into three parts and roll each into strands. Braid them together gently, ensuring not to flatten too much. This will create a beautiful centerpiece that’s sure to impress your friends and family.
With these tips, your mini king cake will not only taste incredible but look beautiful too, making your baking adventure all the more rewarding!
Time Details for Mini King Cake
Creating an unforgettable mini king cake experience doesn’t need to be a race against time. Understanding the different phases of preparation allows you to appreciate each step of the process while savoring the delicious anticipation.
Preparation time
The mini king cake requires about 20 minutes of preparation time. This includes measuring ingredients, mixing the dough, and shaping your delightful mini cakes!
Rising time
Give your cakes some love with a rising time of 1 hour. This helps the dough develop flavor and results in a fluffy texture that’s just irresistible.
Baking time
Your mini king cakes will be ready to bake for approximately 15-20 minutes. Keep an eye on them, as they should turn a lovely golden brown!
Total time
In total, you’re looking at around 1 hour and 40 minutes from start to finish, including preparation, rising, and baking time. But trust me, once you take that first bite, you’ll agree it’s more than worth it!
Nutritional Information for Mini King Cake
Welcome to the delightful world of Mini King Cake! This festive treat is not only visually appealing but also comes packed with flavors that celebrate the season. Before you dive into making this treat, let’s take a closer look at what’s inside each serving.
Calories per serving
Each mini king cake comes in at approximately 200 calories, making it a sweet addition to your gathering without overwhelming your dietary choices.
Protein content
With about 2 grams of protein per serving, these treats aren’t just indulgent; they also provide a little energy boost, perfect for dancing the night away during Mardi Gras!
Sugar content
Keep your sweet tooth satisfied with roughly 10 grams of sugar in each mini king cake. This level of sweetness is just right for a festive celebration.
Fat content
Each serving contains about 8 grams of fat, offering a nice balance of flavor and richness, ensuring every bite feels indulgent while still being manageable.
Enjoy creating and sharing this delightful mini king cake with family and friends!
FAQs about Mini King Cake
Crafting a mini king cake can spark joy and celebration, making it an excellent choice for special occasions. If you’re curious about how to make the most of this delightful treat, you’ve come to the right place. Here are some frequently asked questions to enhance your mini king cake experience.
Can I make this King Cake in advance?
Absolutely! You can prepare your mini king cake a day ahead. After baking and cooling, simply cover it tightly in plastic wrap and store it at room temperature. This way, the flavors meld beautifully overnight, making it even more delicious when served!
How can I store leftovers?
If you happen to have any leftovers, don’t worry—they’ll stay tasty! Store your mini king cake in an airtight container in the refrigerator for up to three days. To enjoy it at its best, let it come to room temperature before serving or pop it in the microwave for a few seconds to warm it slightly.
Can I substitute ingredients?
Feel free to get creative! The mini king cake can be tailored to fit your preferences. For instance, you can use almond extract instead of vanilla for a twist. If you’re looking for a gluten-free option, you can swap in a gluten-free flour blend that works well for cakes.
What occasions are best for making a Mini King Cake?
This delightful dessert is perfect for a variety of celebrations! Whether it’s Mardi Gras, a birthday, or a casual family gathering, a mini king cake adds a fun touch. Its festive appearance and delicious flavors can brighten up any event. So, don’t hesitate to whip one up for your next gathering!
Conclusion on Mini King Cake
As you wrap up your baking adventure with this delightful mini king cake, it’s time to reflect on the joy it brings to gatherings. These bite-sized treats not only capture the festive spirit but also invite creativity in flavors and decorations. Imagine the smiles as friends and family discover the hidden treasures within each cake. Sharing a mini king cake is more than just enjoying dessert; it’s about celebrating traditions and creating lasting memories. Whether it’s for Mardi Gras or just a fun weekend treat, this recipe ensures everyone can experience the magic of king cake in an approachable way. Happy baking!
Print
Colorful Cinnamon Sugar Bread
- Total Time: 2 hours
- Yield: 8 servings 1x
Description
This colorful cinnamon sugar bread is perfect for celebrations and brings a delightful mix of flavors and colors to your table.
Ingredients
Scale
- ½ cup warm milk (about 105–110°F)
- 1 small packet active dry yeast (¼ ounce packet/2 ¼ teaspoons)
- 3 tablespoons granulated sugar (divided)
- ¼ cup salted butter (melted)
- ½ teaspoon salt
- 1 large egg
- ¼ teaspoon vanilla extract
- ½ tablespoon lemon zest
- 2 cups all-purpose flour
- 2 tablespoons avocado oil (for greasing the bowl)
- 3 tablespoons avocado oil (for brushing on the dough)
- ¼ cup granulated sugar
- 1 teaspoon ground cinnamon
- 4 ounces cream cheese (room temperature)
- 1 ¼ cup powdered sugar (sifted)
- 1 tablespoon milk
- ¼ teaspoon lemon zest
- ¾ cup granulated sugar (divided)
- 5–6 drops purple food coloring
- 5–6 drops green food coloring
- 5–6 drops yellow food coloring
- ½ cup powdered sugar (sifted)
- 1 tablespoon milk
Instructions
- Pour the warm milk into a small bowl. Add the yeast and 2 teaspoons of sugar, stir, and let sit for about 5 minutes until dissolved and foamy.
- In the bowl of a stand mixer, stir together 3 tablespoons of sugar, melted butter, and salt. Add the egg, vanilla extract, and lemon zest and mix well.
- Pour the milk and yeast into the bowl and stir until combined.
- Attach the dough hook and add the flour. Mix on low speed until the dough comes together, then increase to medium speed and knead until smooth and pulling away from the sides of the bowl, about 3½ minutes. If mixing by hand, stir the dough together in a large bowl, then knead on a floured surface for 8–10 minutes until smooth and elastic.
- Lightly oil the dough and a clean bowl. Place the dough in the bowl, cover, and let rise in a warm spot until doubled in size, about 1 hour.
- Turn the dough onto a floured surface and knead briefly. Roll into a rectangle about 13 by 16 inches.
- Brush the dough with oil. Mix the sugar and cinnamon in a small bowl and sprinkle evenly over the dough.
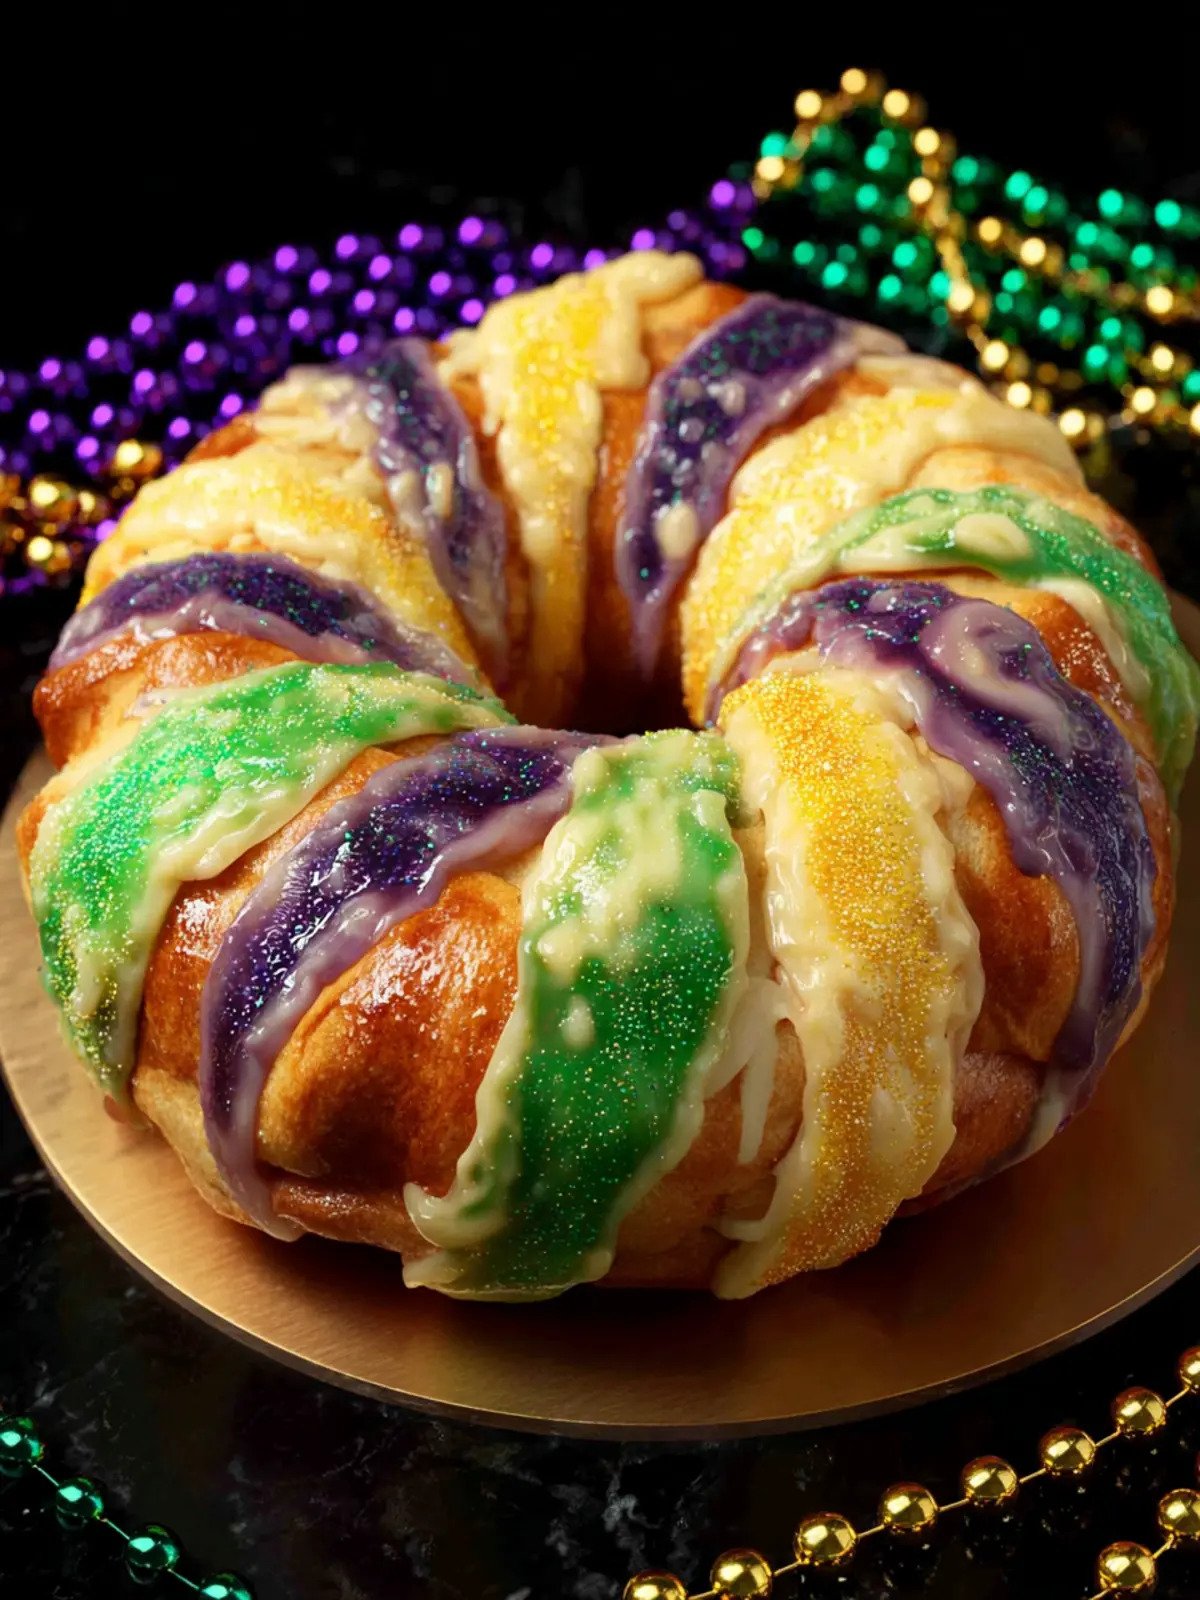
- Fold the dough in half lengthwise to form a long rectangle. Cut into three long strips. Braid the strips, pinch the ends to seal, and gently shape into a circle.
- Transfer the dough to a parchment-lined baking sheet. Cover and let rise until doubled, about 1 hour.
- While the dough rises, beat together 4 ounces of cream cheese, 1 ¼ cup of powdered sugar, 1 tablespoon of milk, and ¼ teaspoon of lemon zest until smooth. Transfer to a piping bag or zip-top bag with the corner snipped.
- Preheat the oven to 375°F (190°C). Pipe the cream cheese filling in a circle on top of the dough. Bake for 10–12 minutes, until lightly golden. Cool for 10 minutes.
- Divide ¾ cup sugar evenly into three bowls. Tint one purple, one green, and one yellow, stirring until fully colored.
- Whisk ½ cup of powdered sugar and 1 tablespoon of milk until smooth. Drizzle over the cooled cake, then sprinkle the colored sugars in alternating sections.
- Slice and enjoy.
Notes
- Keep the dough in a warm place to ensure proper rising.
- You can use any neutral oil for greasing and brushing the dough.
- Prep Time: 30 minutes
- Cook Time: 12 minutes
- Category: Dessert
- Method: Baking
- Cuisine: American
Nutrition
- Serving Size: 1 slice
- Calories: 250
- Sugar: 15g
- Sodium: 150mg
- Fat: 11g
- Saturated Fat: 5g
- Unsaturated Fat: 4g
- Trans Fat: 0g
- Carbohydrates: 33g
- Fiber: 1g
- Protein: 4g
- Cholesterol: 35mg